Friday, 4 March 2016

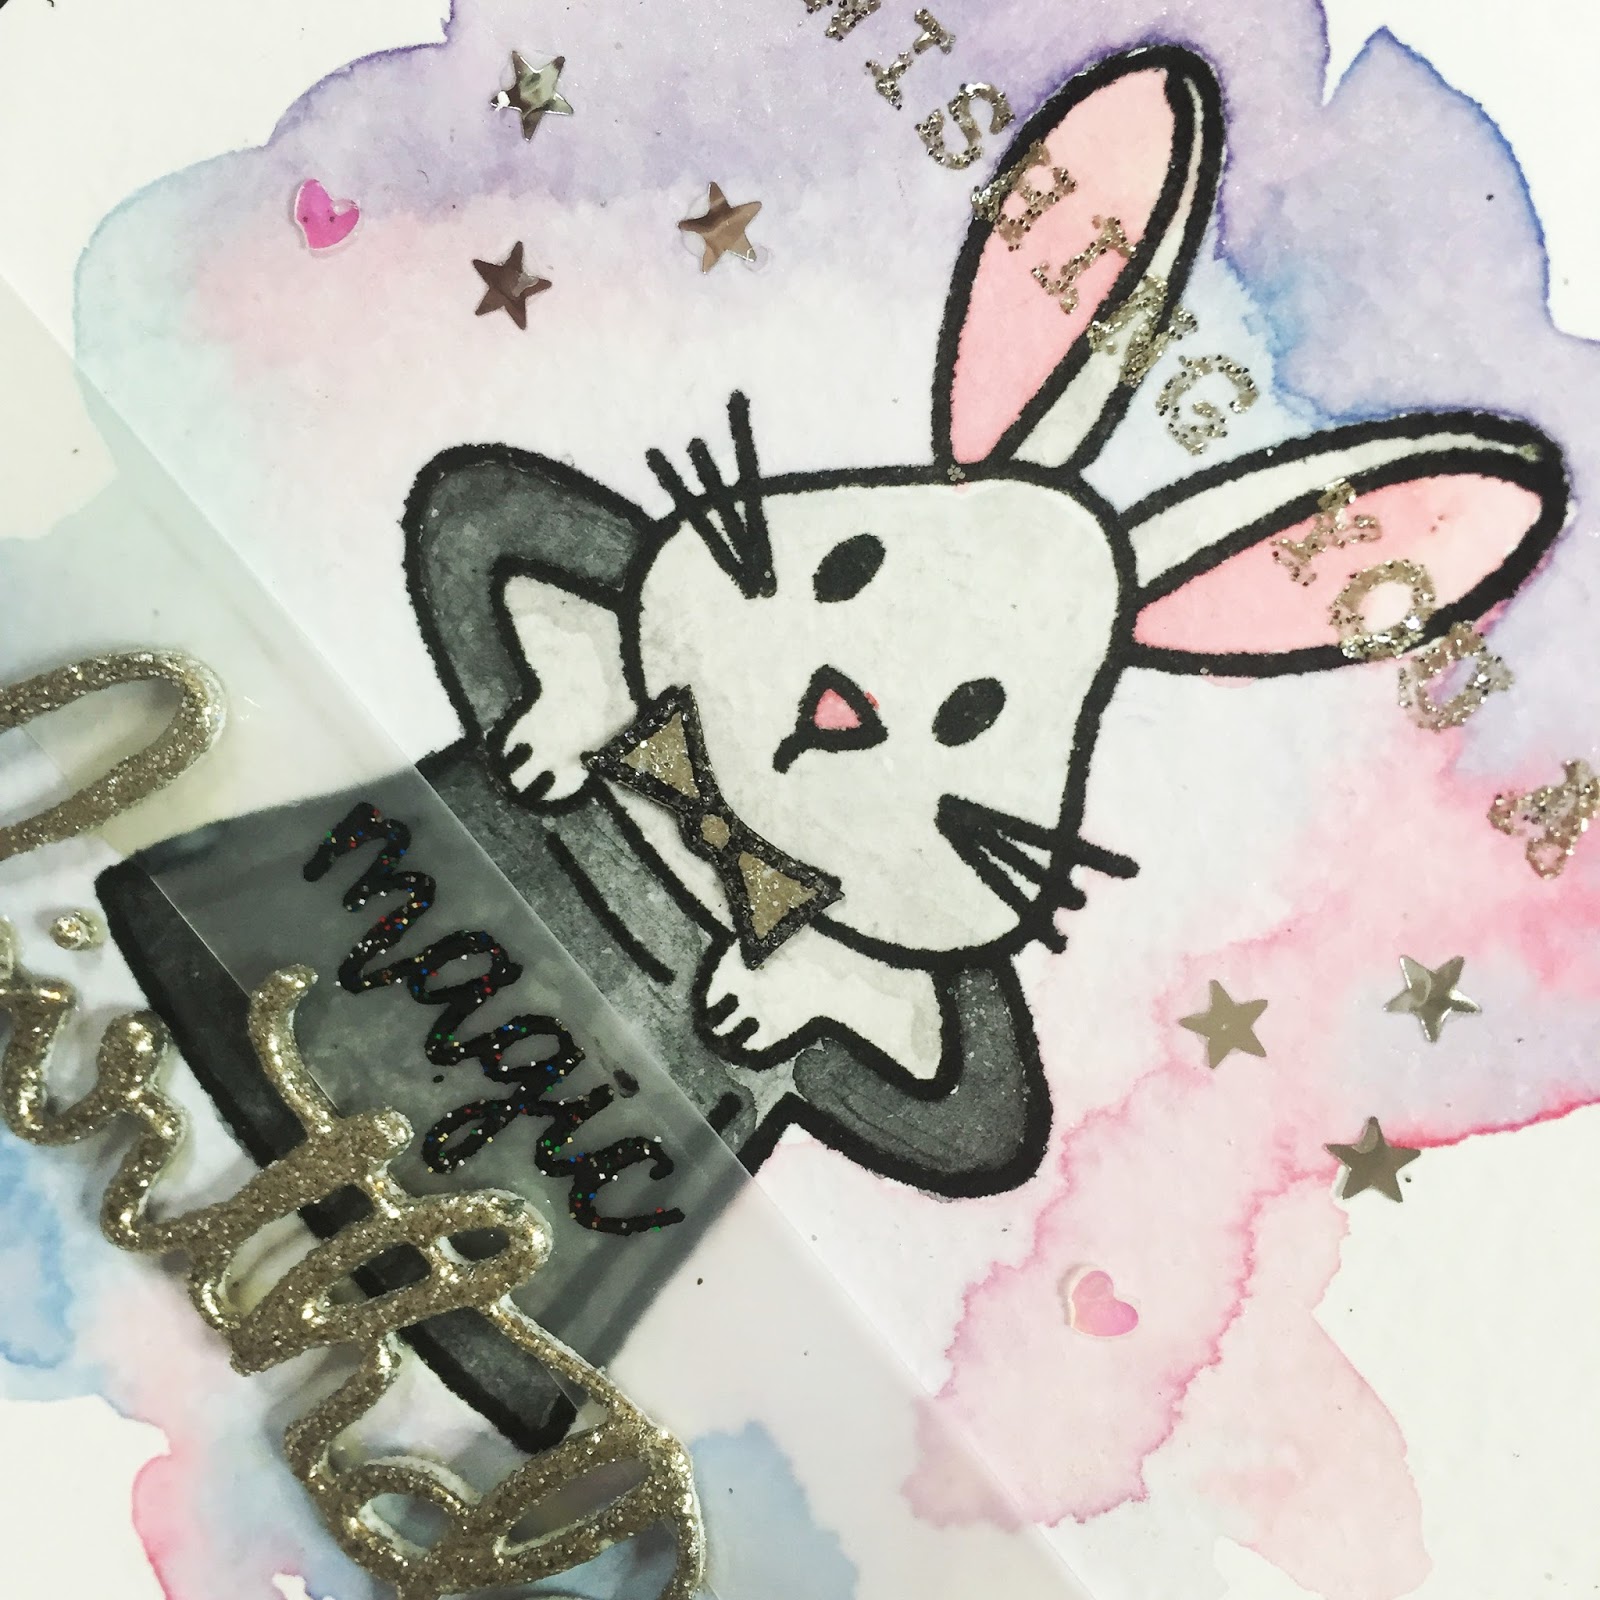
A little bit of magic.

Hi everybody,

Jill here and today I've got a little bit of magic for you...


...using Avery Elle's Pure Magic.


This is a new set from Avery Elle's latest release and is so adorable, it is also like nothing I already have which is just, well, magical :) !  It's great when a set comes out and it is something completely original, always a must-have for my stash!  
I started by stamping out the little rabbit in the hat using Versafine ink and clear heat embossing, I then used masking fluid to mask off the whole image to allow me to create a background wash using various Distress Inks.  Once completely dry, I removed the masking fluid and water coloured the sweet image, again, using Distress Ink. 


My sentiment is made up of a few different bits and pieces - the 'Wishing you a' is from Mama Elephant's Happy Everything set and stamped out and heat embossed in silver sparkle, the 'magic' is from the same main gorgeous Avery Elle Pure Magic set and is stamped out onto vellum and heat embossed in black sparkle powder, and the 'birthday' is cut using Mama Elephant's Birthday Script Creative Cut die, cut from funky foam, smooshed in Versamark and covered in Silver Sparkle powder and heat embossed, knowing this would shrink the funky foam creating a smaller cuter word embellishment


After building up and adhering into place all the different bits of my sentiment, I gave my bunny a  snazzy little silver sparkle bow by stamping, and fussy cutting it from a piece of card I had embossed.  I added a scattering of tiny stars and hearts to create that little 'poof' of magic,  mounted the whole piece onto black card, onto a card base, and that was that.

I really hope you like it, as always, everything I used is linked below, and I shall look forward to seeing you all next week.

Jillx

Pure MagicBirthday Script Creative Cut Image 1  Happy Everything Image 1

Friday, 26 February 2016

Space Bear Walk

Hi everybody,

Jill here, and this week I've got a little galaxy action going on...


Using those brilliant Space Bears from Mama Elephant.


These Bears are so fun!  I mean, what's not to love about a bear in Space helmet?!  So I decided to take them on a little space walk...
I started by creating my galaxy background.  I purposely made it a little more pastel by using a lot of grey on top of my purple, blue and yellow ink, with only a teeny bit of black as I didn't want it to feel too imposing.  I added a load of white and shimmery splats and splodges and left to dry.  I stamped my bears onto watercolour card and twice each onto vellum to create their helmets.  I coloured my bears using my Zig Clean Colour Brush pens and fussy cut, cutting off their  helmets (ouch) on the card, but only cutting out the helmets on the vellum...you with me?  I then adhered my helmets back onto my bears using the almighty Stick-it.
I created a planet base by cutting an oval and water coloured it with a mix of Distress Ink.  I added a black frame using Mama Elephant's Index Card Creative Cuts and stamped my sentiments, from the same cool Space Bear set, onto light grey card, in black, clear heat embossed, and cut into little banners.


Then for the fun bit...building my scene.  I used some bright yellow twine for my space rope...ok ok, I know it's not called space rope...but it is today...and tied to each Bear's hand, keeping it in place by adding a dab of wet glue.  My bears are kept in place with foam pads, and I added a load of stars I made using stick-it covered in silver glitter, cut using Mama Elephant's Confetti die, to my background.


And there you have it...Space Bears on a Space walk...now there's a sentence I never thought I'd say haha.

As always, everything is linked below, and I shall see y'all next week.

Jillx

Space Bears Stamp  Index Card Creative Cuts Image 1  
Confetti Creative Cuts Die Image 1  Stick It - LARGE

Friday, 19 February 2016

It's the small things in life.


Hi everybody,

Jill here, and this week I've got a little bit of Good Luck for you...


...using the little elements of loveliness from Lawn Fawn's 'My Lucky Charm' set.


I've had this set for a while now, and love all the cute bits and pieces you get in it, but was yet to ink it up, (I know, shameful behaviour!), so thought I'd eventually let it see the light of day, and make a cute and simple card using the smallest parts of the set.


I started by stamping out all the elements I wanted to use, coloured using Copics, and fussy cut.  You get a sweet little smiley face in the set so I added that to my largest star.  I wanted my lucky wishbone to be metallic, so heat embossed a piece of card in gold, and stamped my wee bone onto that and, again, fussy cut.  I knew I wanted to make a little scattered scene of all my small elements, so die cut a circle in the middle of my panel as a focus point, and covered in a piece of vellum for a little added interest.  


I stamped out the sentiment from the same, 'My Lucky Charm' set, and heat embossed in red.  I also heat embossed a piece of card in the same red powder, and cut a load of the Paper Smooches 'Tiny Hearts' from it to add as embellishments around my scene.  This tiny little die set form Paper Smooches is a)incredible value for money, I mean, yes, it is tiny, but woah...check it out; and b)sooooo cute with really cool shaped hearts, and the cutest little arrow.  Definitely worth a place in your stash - I use mine all of the time.  
So I added a twirl of twine, and built up my little scene using tiny bits of foam adhesive for dimension.
I added my panel to a kraft card base, and that was that, an easy, quick and cute card using the teeny little stamps we sometimes over-look.

I really hope you like it, and as always, everything I have used is linked below so be sure to go check it out.

See you next week.


Jillx

My Lucky Charm Image 1Tiny Hearts Dies


Friday, 12 February 2016

Family feels.

Hi everybody,

Jill here, and this week, I've got some sweet family vibes for you...


Using the adorable, New Family, from Mama Elephant.


The images in this set are soooo super sweet.  I mean, there's a baby fox in a nappy!  Yup, a baby fox...in a nappy!  Just looking at the set makes me want to do a little squeal!

The images themselves are kind of gentle and delicate, so I wanted to keep my card light, and airy to match.

I started by stamping out my cute little family and this pretty leafy vine, colouring them all using alcohol markers, and fussy cutting.  I then added a small watercolour wash onto a piece of card using various Pastel-esque Distress Inks, and left to dry.


My sentiment is from the same New Family set, and is just going to be perfect to send to my friend who has recently announced her family is about to become one bigger (Congratulations Kristina!).  I don't have many 'new baby' sets, so this is a very welcome addition to my collection, and of course, the images are just so sweet and gorgeous, you can use them independently any which way you like.
I stamped out my sentiment in black Verasafine and clear heat embossed.  I then built up my scene using foam adhesive for a little dimension.


Like I said, I really wanted this card to be soft and gentle, so I embellished with a scattering of pretty pastel sequins, a few Glossy Accent dew drops, added a natural twine bow, and there you have it.

As always, everything I have used is linked below, so if you haven't already coo'ed over a baby fox in a nappy yet...go do it now!

Hope you like it, see you next week.

Jillx


New Family Stamp


Friday, 5 February 2016

Flowers, Frills, and Bows...

Hi everybody,

Jill here, and this week, I've got a little bit of 'chintz' for you...


...full of flowers, frills and bows...


My main panel is made using Mama Elephant's Bloomsies.  A delightful set packed with gorgeous little flowers and sprigs, a ribbon banner and equally delightful sentiments.  I took a load of the different flowers, the ones with more 'open space' to them, stamped them all over a piece of watercolour card, and heat embossed them in white.  I then water coloured each little bloom with different Distress Inks, and washed over the whole of the background.  I then took a piece of vellum, and cut several layers of scalloped borders, (I used a die from my stash but I have linked this one from WPlus9 as it will work every bit as well), so once all lined up and layered on top of each other, it would create this cutesy little frill.  I then added this to my background panel, with a little wrap of ribbon and a sweet neat little bow.  


My banner and sentiment are also from the Bloomsies set, and are stamped onto vellum and heat embossed in silver powder.  I wanted my banner to have some dimension, which can be very tricky when using vellum, so I stamped it out a few extra times and just  used the 'tails' behind to help build it up.  I used Stick-it to adhere my extra tails to the banner, and my banner to the card - it works sooo perfect with vellum as it doesn't show!  Pretty magic really!  I embellished with a scattering of pearls to keep the whole 'chintzy' vibe up, and there you have it.

I hope you like it, and as always, everything I used is linked to our fabulous store, below.
See you next week.

Jillx


Bloomsies   Stick It Die Cut Adhesive Sheets (pack of 5) Large

Scalloped Border Die


Friday, 29 January 2016

Monkey Business...

Hi everybody,

Jill here, and today, I'm monkeying around...


...with the new release from MFT, Monkey Business...


How cute are these little chaps?  I'm really excited to start building up my MFT's collection from the store - and with sets like this - who can blame me?!
I wasn't sure where I wanted to go with this card when I first started, I just knew I couldn't wait a minute longer to ink these cheeky monkeys up!  I stamped a few of them out, (the set actually contains FIVE different monkeys - all as cute and fun as the next), masking each one as I went to create my little scene.  I added the little mound from another new MFT set, 'Ewe are the best', (another insanely cute set that I could not resist), to give them a little beachy verge to hang out on.
I coloured them with my Copics, and masked them off once again to create an inky background.  The sentiment is included in the Monkey Business set, along with a load of other funny phrases that I just think will be great for so many different people and occasions.  Once I'd finished my little scene, I decided I'd turn it into a full frontal shaker.  You get a load of extra banana's in the set, and I thought it would be fun to colour and cut a load out to add as little shaker elements, so that's what I did!


I also used the 'loose banana' stamps to add interest to my kraft card frame, and added a bunch of, yup you guessed it, bananas, to finish off my card.


I really hope you like it, and I can't wait to see what mischief you all get these little fellas into with your creations!

As always, everything I used is linked below so be sure to check it out.

See you next week.

Jillx


Cheeky Monkey StampEwe Are The Best Stamp


Tuesday, 26 January 2016

Tara, YOU ROCK! Seven Hills Crafts Surprise Blog Hop...

Hi there,

'Surprise Tara' - and welcome everybody to my place on our surprise Blog Hop :) !

So I know you'll all agree that the new store is 'off the scale' amazing, and Tara and Rick have worked their socks off to get it sorted.  I honestly don't know how they get so much done in a day - but they constantly inspire and amaze, not just me, but all of us gals.  I have always had such respect and admiration for the folk in this world who have the courage and determination to chase their dreams  - and the work ethic with which Tara and Rick chase theirs, well, it is nothing less than jaw-dropping.
So, Julia came up with the idea that it was about time we all said 'You are Amazing', and to let them know that we think they're all kinds of awesome!

And here's my way of saying it...
Made using the 'Love you. Mean it', set from Concord & 9th.
I used several layers of embossing to create my card.  I stamped out each little element, and heat embossed them using various coloured powders, heat setting each colour as I went - then layering up on top and all around to create this pretty wreath.
The sentiment is from the same 'Love it. Mean it' set, and is stamped in the middle of my wreath, and heat embossed in white.  I finished by edging my card with a little ink, and adding a few touches of Glossy Accents to a few of my elements.
I love this set and think it is so versatile as you could build it up in so many different ways, with so many different mediums - the only limit is your imagination :)

Thanks you all so much for joining us on our surprise hop!  Tara and Rick - I hope you're enjoying it, and I hope you know how appreciated all of your hard work is.  You have created a wonderful little community that I, for one, am very proud to be part of :)  

You're all in for a treat next as you're off to our incredibly talented Julia's blog - it's all linked up below for you, (as are all the products I have used), so just click the link and 'hop along'!

Enjoy...

- Keren https://kerenbaker.wordpress.com
- Jenny http://craftinginthecountry.blogspot.com/
You are here - Jill http://paperlovebuzz.blogspot.com/


- Lydia  http://lydiaevansdesign.com/

See you next time.

Jillx

Love You.  Mean It.