Friday, 23 February 2018

Sparkle, Paste, & Acetate.

Hi everybody,

Jill here, and this week I’m experimenting with texture paste on acetate...


...& adding a ton of sparkle because who doesn’t love a bit of sparkle!


I started with a simple piece of acetate and a desire to make it sparkle! I used Altenew’s Halftone Stencil and spread a good layer of paste over-top, sprinkled with Lawn Fawn’s Chunky & Prisma Glitters, then set aside to dry.
I then covered a piece of white card in Stick-It and cut Lil Inker’s Stitched Butterflies from it, peeled back the Stick-It and, again, covered in Lawn Fawn’s Chunky & Prisma Glitters.
My ‘Hi’ is from My Favourite Things’ Hello There die set which I cut from card and heat embossed with Lawn Fawn’s Rose Gold embossing powder several times to create a nice substantial molten metal look element.
Once my acetate panel was dry I cut a frame from both my card blank and another piece of card, allowing me to sandwich the acetate in between creating a pretty sparkly acetate fronted card.
I built up my other elements and adhered in place, adding a silver bow to finish off.


I added a panel of silver sparkle card on the back of my card so the pretty went all the way through, and there you have it.
I love the way the texture paste has worked with the acetate and look forward to a little more experimentation!


As always, everything I used is linked below.


See you next week.


Jillx

Halftone Stencil Stitched Butterflies Die Image 1 Hello There Dienamics

Embossing Powder - Rose GoldGlitter - Chunky Glitter - Prisma

Friday, 16 February 2018

Hear me Rawr!

Hi everybody,

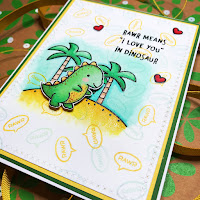
Jill here, and this week I’m ‘rawr’ing sweet nothings...


...using Lawn Fawn’s delightful Rawr mini set.


Another absolute knock-out mini set from Lawn Fawn. Incredibly affordable and beyond cute, what’s not to want?!

I started by stamping out my cute little dinosaur, colouring with Copics, and cutting out.
I then stamped out my background using a few little pieces from Lawn Fawn’s Life Is Good to build up a scene and, again, coloured with Copics creating a (or attempting to) soft blends around the edges.  I then took the little speech bubble from the Rawr set and lightly stamped it all across my background for a little added fun.

My sentiment is also from Rawr and is stamped directly onto my background and heat embossed.
I add a few little hearts to embellish and to add a contrast colour so it wasn’t all too ‘matchy-matchy’.
I matted onto colour card and there you have.


Quite a young fun simple card (hopefully) showing how one teeny little stamp set can still pack a punch!

As always everything I used is linked below.

See you next week.

Jillx


RAWR  Life is Good Image 1

Friday, 9 February 2018

Arctic Amour

Hi everybody,

Jill here, and this week I’ve got a Valentine’s love story...


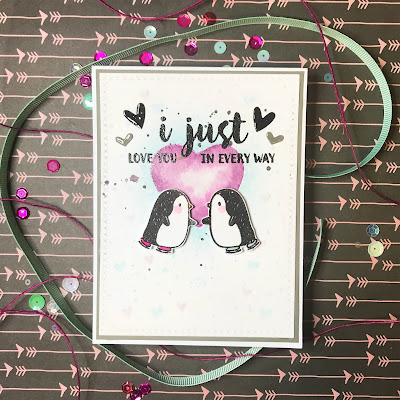
...starring Mama Elephant’s adorable Arctic Penguins.


I think I have a tendency to see these delights as a Christmassy set for some reason. Well, no more! These perfect penguins are free to play any time, and what better time is there for such wonderful creatures to make an appearance, (I mean...partners for life *heart strings officially pulled*), than to help celebrate the day of love, Valentine’s.
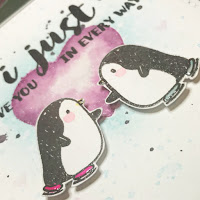
I started by cutting a heart stencil and using the negative piece to colour inside with a mixture of Zig Markers & water. I then added a few flicks and splashes across my background, and a ton of tiny hearts. I then stamped out my perfect pair of penguins, added a wee touch of colour, & cut out. My sentiment is from Wplus9’s wonderful, That is all, which is a set with so many different options for how to build your sentiment up in a really gorgeous font, absolutely love it. I stamped my sentiment straight onto my card and clear heat embossed. I cut some Tiny Hearts from Paper Smooches (seriously the best value dies I have EVER bought), and added to my card front.


I adhered my sweet couple onto the front of my card using foam tape for a little dimension, and finished with a slick of gloss to the hearts and penguins' beaks and skates.

I really hope you like it.
As always, everything I used is linked below.

See you next week.

Jillx


Arctic Penguins Image 1  That Is All  Tiny Hearts Dies Image 1

Friday, 2 February 2018

Bright and Bold Rainbow of Happy!

Hi everybody,

Jill here, and this week I’ve got a bright and bold rainbow of Happy for you...


...with Mama Elephant’s Happy Script taking centre stage.


I love me some snuggly cosy winter vibes but, holy macaroni, the brighter sun & the lighter evenings creeping in have me so excited for springtime! I decided to let my lust for brighter days take over me and lead the way in this sparkly card of celebration!
I started with my watercolour rainbow, achieved by mixing Distress Ink with water and blending them in order across my background. I was feeling inspired to get messy and knew I wanted a bit of bling on my card so reached for some silver sparkly texture paste but it had all dried up so I decided to make my own...which went horribly wrong and I just ended up with a ton of grey sludge haha. ‘Waste not want not’ however so I persevered and used that along with Altenew’s gorgeous Tiny Bubbles Stencil and swiped it across my background.  I then added a layer of silver glitter over the top to achieve my required look and left to dry.


I then cut Mama Elephant’s Happy from white card and foam and adhered together to form a nice substantial sentiment. I don’t think I will ever tire of die-cut sentiments. to this day these beautiful cursive Creative Cuts from Mama Elephant remain my absolute ‘Ride or Dies’ *pun intended :)
I also cut MFT’s Stitched Scallop Circle from some silver glitter card to use as a point to build around and, after white embossing the rest of my sentiment onto black card, adhered all my pieces in place.
I matted onto some grey card, embellished with a scattering of sequins, and there you have it.


A sparkly celebratory rainbow of Happy!

As always everything I used is linked below.
Hope you like it.
see you next week.

Jillx


Happy Script Creative Cut Image 1  Tiny Bubbles Stencil Stitched Circle Scallop Edge Frames Dienamics