Showing posts with label distressink. Show all posts

Monday, 13 July 2015

Rainbow Vibes...

Hi everybody,

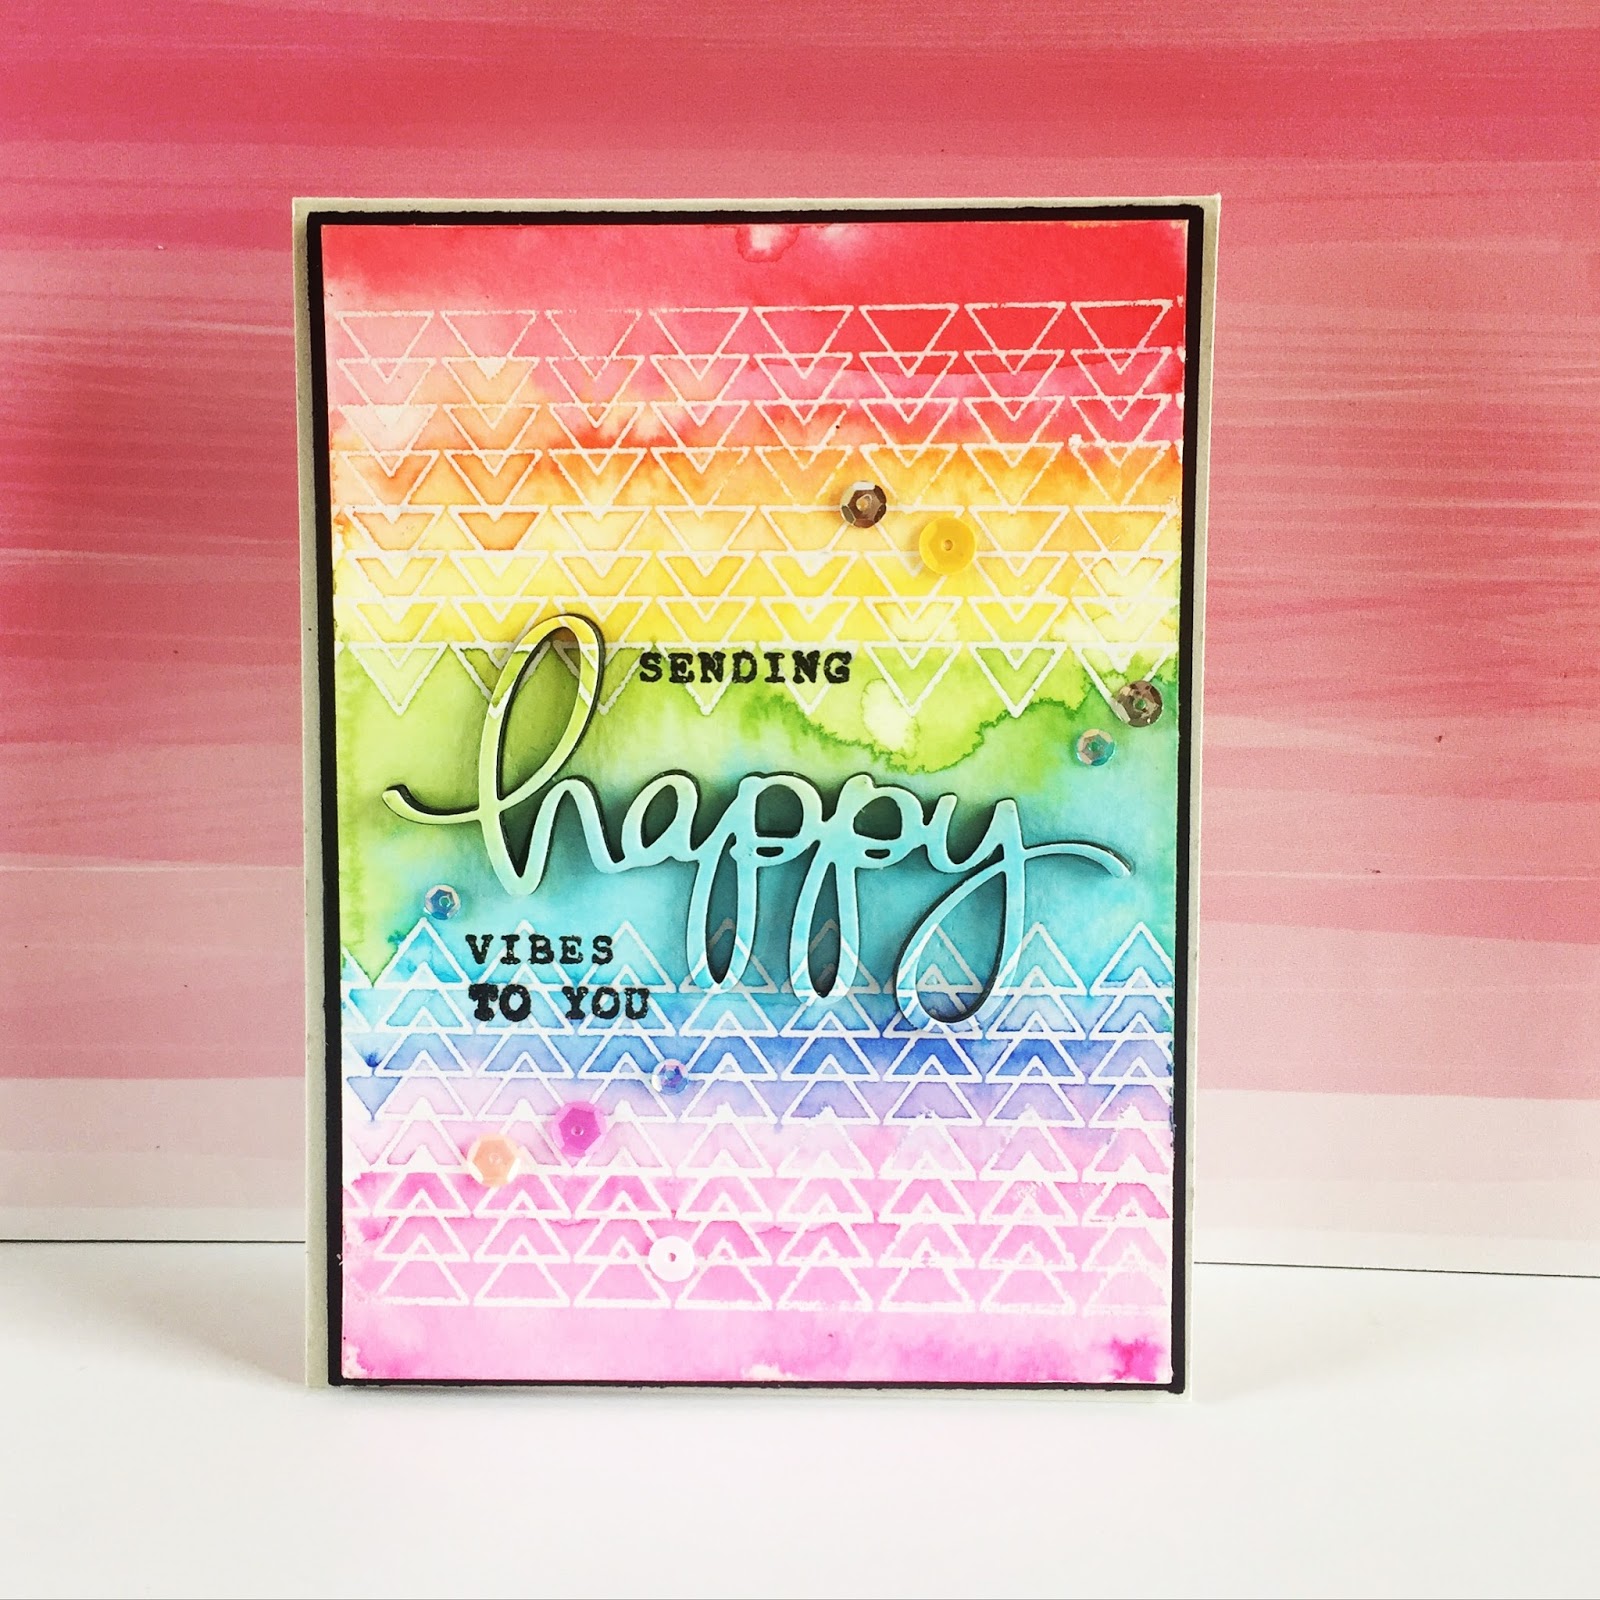
A quick post to share a card I have made for the current Mama Elephant Flickr Challenge, where this time round, it's all about the Rainbow.

And here's my card...


I made my background by repeat stamping one of the borders from the Zennith Borders set, and heat embossed in clear powder.  I then created my rainbow, using Distress Inks as watercolour, and washed them over my embossing, overlapping each colour to create a nice blended effect.  Once dry, I die-cut Mama elephant's 'Happy' die form the centre, added a ton of black layers of the same die cut behind, and in-laid back in.  I built up my sentiment from the Happy Everything set, and heat embossed in Black Sparkle powder.  I embellished with a scattering of sequins in a rainbow of colours, matted onto black card, and then adhered the whole thing onto a kraft card base using foam adhesive.


And there you have it, a Rainbow of happy vibes :)

Hope you like it, follow the link above to see what everyone else came up with.

See you next time.
Jillx


Tuesday, 23 June 2015

Do more of what you love...

Hi everyone,

A quick post to share a card I have made for the current challenge going on over at the awesome Simon Says Stamp Wednesday Challenge Blog, and this time round, 'Simon Says Use Your Favourite Technique and/or Product'.

Simon Wednesday Challenge Blog

Now, I'm greedy, so I went with my Favourite EVERYTHING!!!  And here's where it took me...


So, my favourite things in this delightful world of craft are - watercolour washes (especially when used with a resist), Distress Inks (especially when used as a watercolour wash), and in-laid die-cutting (especially when used with a Distress Ink water colour wash :) )


I used Neat and Tangled's 'Hello There' stamp and matching die set for my card.  

I started with a piece of watercolour card, and stamped out the first line of my sentiment in clear powder, and heat embossed.  I then washed over the front of my card with three different Distress Inks - Picked Raspberry, Mustard Seed, and Peacock Feathers - allowing a slight overlap of each colour to create a soft blend.  once dry, I die-cut this gorgeous swirly 'Hello' from my piece, and, after adding a few layers to the back to give some dimension and to allow it to pop forward form the page, I 'in-laid' it back onto my card panel.
I used the same three Distress Inks to create splatters across my card front, and there you have it.
All my favourite products and techniques, whilst staying true to my favourite kind of design...Simple, yet bright and bold!

I really hope you like it.

Jillx


Wednesday, 27 May 2015

Having a pop at Pop Up...

Hi there,

Well, today has been one of those frustrating days where nothing seems to turn out right!  I wanted to make a card to play along with the current Lawnscaping Challenge, where this time round, the theme is, 'Try A New Technique'.  I love the recent trend that's emerging for cute 'pop up' cards, and hadn't tried my hand at it yet, so thought I'd give it a blast.


And here's where it took me...


I had recently bought the Mama Elephant's 'Pop Up Trio' die, so used that, along with Lawn Fawn's gorgeous 'Whale You Be Mine' set.  I also used the cloud die from Mama Elephant's 'Landscape Trio' set, to create my waves.  


Using the cloud die, I die cut one piece of watercolour card into many sections, (the idea being to create many waves and a sunset) and water colour washed each part in different Distress Inks, cutting and colouring an extra 'wave' at the same time to use as my first layer.  Now I don't know why, I think it may have been due to the wave I wanted to 'Pop Up' as my first layer, but for some reason, everything got a little confusing when I came to die-cutting the 'Pop Up' parts to get it to work.  I had to add little tabs to get my Whales to sit at the height I wanted them, and everything got a little, shall we say, 'testing'!  But hey ho, the challenge was all about trying something new, so I should have expected a bumpy road!  I eventually ended up some where close to what I pictured when the idea for this card popped in my head.  I watercolour washed a scrap of card in Picked Raspberry Distress Ink and cut Lawn Fawn's 'Tiny Hearts' from it to embellish with, and then stamped out my sentiment from the same 'Whale You Be Mine' set in black ink.  I also gave my whole piece a spritz of 'white', and a spritz of 'shine' spray, to make it glisten like water.
I then took another piece of card the same size, as a cover, and washed this piece in Picked Raspberry and Spiced Marmalade Distress Ink to match the sunset on the inside.  I stamped one of Lawn Fawn's 'Flirty Frames' on the cover, adding only dots to it, so that all the excitement is kept hidden inside!
And there you have it, a very not perfect Pop Up card!  ...And if you made it to the end of this post, you deserve a medal! Haha.

I hope you like it.

Jillxxx

Tuesday, 12 May 2015

Pretty setimental...

Hi everybody,

I'd like to share a card I made for the current challenges going on over at the delightful, Mama Elepehant, (which is now hosted via Flickr), and the awesome Simon Say Stamp Wednesday Challenge blog.

And here it is -

  
*Brag Alert* ...I was lucky enough to win the last Mama Elephant Flickr Challenge, which I was so thrilled about!  The challenge this time is to 'Make Me Say "Ooh That's Pretty', and the Simon Says Stamp Challenge is 'Let's get sentimental'.  I instantly had an idea in my head that I wanted to create a kind of Pinterest inspired 'Inspirational quote' poster/print kind of vibe, (you know the sort), and I thought the Bokeh effect would work perfect so went with that. 


I used Picked Raspberry, Peacock Feathers, Spiced Marmalade, and Fossilised Amber Distress Inks to make up my background.  I then die cut several sized circles from a piece of weighty cardstock, creating my own stencil, and blended white ink over the top, going from large to small circles, increasing the depth of the ink as I went.  Once I was happy with my panel, I stamped out my sentiment using Mama Elephant's 'splendid' set, in Versmark Ink, and heat embossed in white powder.


Like I say, I wanted my card to look like a print or a poster, so kept embellishments simple by adding a scattering of sequins, and some glossy accents to create pretty clear pearls, or little dew drops as I like to see them.
I adhered my panel to a beautiful Pool coloured Avery Elle notecard, and there you have it...'a pretty sentiment'.  I really hope you like it and would love to read your comments.

See you soon.

Jillx


Simon Wednesday Challenge Blog


Sunday, 10 May 2015

A dream come true...

Hi everybody,

Well, well, well ... I have got the best news ever to share (well, for me!) - I have been asked to join the Design Team over at my favourite place on The Internet....Make the Day Special!  I can't believe it, I am such a megafan of their blog, and their shop - oh my oh my - I think I own half of it haha.  Pretty much my full stamp collection is from there - Tara who runs it (amazingly well, and all on her own I might add!), has THE best taste, and the prices are unreal amazing.  Yes, I'm gushing, but i really really love it!!!  So I obviously wanted to share my very first post here as well - and here it is :)
...

Jill here.  I can't tell you how pleased I am to be part of this amazing and talented team, it really is a dream come true.  I only hope I do you guys, and all the awesome products we all love, justice!

So, without further ado,  here's a sneak peek at my first offering...


Deciding what to do for my first post was such a tough decision!  I came to the conclusion that the best way to introduce myself was to stick to a couple of my, (and hopefully your) favourite things - Mama Elephant and watercolouring!


I used Mama Elephant's 'In My Heart' set, Lawn Fawn's 'Grassy Border', and 'Spring Showers' dies and a whole lot of watercolour, to create my bright Springtime scene.  


I die cut my back panel into several pieces, giving each piece a watercolour wash using Distress Inks, and pieced it back together so it remained in one layer.  My little cutie patooties from the 'In My Heart' set, are watercoloured, again using Distress Inks, fussy cut, and added to the front of my card using foam adhesive to really make them 'pop' off the page.  I stamped out my sentiment direct onto my card, and heat embossed using a Black Sparkle powder.  I finished  by embellishing with a couple of bright yellow enamel hearts to give an extra splash of colour, and there you have it.  The sun isn't shining up here in the North of England, so I thought I'd make it shine on my card!

I really hope you like it, and all the products I used are listed below, so go and give them a closer look!

See you all next week.
Jill


In My Heart           Spring Showers Dies       Grassy Border Die


*I should have published this post on 1st May...oopsy*

Friday, 20 March 2015

Delightful Distress...

Hi there,

A quick post before I have to go to work (booooo), to share a card I have made to enter into the current challenge going on over at the, always awesome, Lawnscaping Challenge blog.  Please excuse me as I brag for a moment...but I LOVE this blog, and was beyond thrilled to discover I won the last challenge...how exciting?!  So in any case, back to the task at hand, sorry, I just couldn't help but share my awesome news :)


Now, this time round, the theme is 'Distress Addicts'.  And here's my card...


I am out and proud...My name is Jill and I am a Distress Ink addict.  Like out of control, head over heels, in love, couldn't live without them, kind of addict.  So Lawn Fawn, plus Distress...I was obviously only ever going one direction!
I started by stamping out the heart border for, 'Belinda's Borders', several times to create a background, and heat embossing in clear powder.  I then smooshed and spritzed Abandoned Coral (February's release...and oh my what a release!), Worn Lipstick, and Tea Dye Distress Inks, on my craft sheet, pulled my card through the ink, and put aside to dry.  I then stamped out these gorgeous little bunnies, from the 'Snow Day' set, and painted them up using, yup, you guessed it, Distress Inks.  I added a wee little bow from the 'Monster Mash' set to my little girl bunny.  I also stamped out my speech bubbles from the 'Chit Chat' set, and added the 'U' to an empty bubble to complete my loved up sentiment, (I plan on giving this card to my amazing boyfriend as we are about to celebrate our 10th year together).  I coloured my speech bubbles using the gold watercolour form the Kuretake Gansai Tambi set, and used my finger to smudge some of the colour away to add to the 'distress' look.  I stamped out  the heart, also from the 'Snow Day' set, heat embossed in Platinum Sparkle, and cut out.  I also heat embossed some tiny hearts confetti at the same time to use as embellishments.  I used a couple of border punches on vellum, some ribbon, and some raw twine to ground my scene, and adhered all my bits in place using foam adhesive.  I added my little hearts to go all out on my loved up setting, and mounted onto a kraft card blank.  And there you have it.  I like how this card came together, and love the way my background came out.  I hope you do too.

I'd love to know what you think, so please feel free to leave a comment.

Hopefully see you soon.

Jillxxx


Thursday, 19 March 2015

Make The Day Colourful...

Hi there,

I'd love to share a card I have made for this month's challenge going on at the awesome, Make The Day Special Challenge blog, which this time round, is a colour challenge.  Pick your palette, and go for it...


I chose those beautiful chilled out tones of the first option, and here's my card...


I used Mama Elephant's, 'Zenith Borders', stamp set to create my background.  I stamped out one of my borders, a couple of times, in Versamark, and heat embossed it clear powder.  I used Distress Inks, in Tumbled Glass, Broken China, Squeezed Lemonade, and Dusty Concord mixed with a little Victorian Velvet, to wash all over the top of my stamped borders.  Once everything was dry, I ironed the embossing powder off to create this kind of flat, batik effect.  I then used Mama Elephant's, 'Happy' die to cut right out the centre.  I also cut this die a few other times, on kraft card stock, and, using the double sided adhesive Stick-it, stacked the dies on top of each other, adding the coloured piece to the top, and inlaying the whole thing back into my panel for a really dimensional look.  I finished my sentiment by stamping out 'vibes' from Mama Elephant's 'Happy Everything' set, which is just A-MAY-ZING, a sentiment for any occasion. and just sooo cool looking, I LOVE it!!!  I finished off by embellishing with a few co-ordinating sequins and mounted the whole thing onto a kraft card base...and there you have it.

I'm really happy with how this card came out, which is a lot more down to Mama Elephant and there awesome products than me haha, but hey ho.

I'd love to know what you think, so please feel free to leave a comment.

Hopefully see you next time.

Jillxxx
