Friday, 25 March 2016

Bright, bold, & black resist.


Hi everybody,

Jill here, and this week I've got an old technique with a new twist...


Inspired the great, the mighty, the queen herself...Jennifer Mcguire.


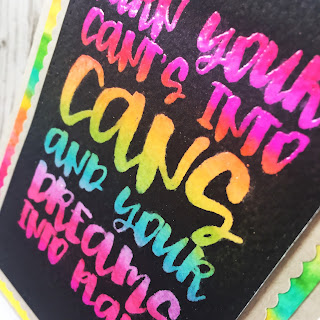
Jennifer's latest video shows the good ol' emboss resist technique...but using black ink.  Instantly one of those, 'oh wow how has that never crossed my mind?' moments.  I loved the results, so just had to give it a go...but just make it a little more 'me'.
I knew I wanted a statement sentiment to use for my resisted area, so chose Wplus9's 'Dreams Into plans' - love this stamp, it works for so many occasions when you want to say something a little different.  


So I started with a piece of white card which I scribbled a rainbow onto using my Zig Clean Colour Markers, but you could use any colour medium you wanted to, and blended together with using water.  Once dry, I stamped and clear heat embossed 'Dreams Into Plans' over the top.  I then took a black ink pad, I used Black Soot Distress Ink but you could use any water based black ink, or even a marker, and rubbed it all over the top.  To get a really intense black I took the actual pad to my card.  The black colours the entire card, but resists where your embossing powder is.  Now I use the emboss technique all of the time, I absolutely love it, but I have never thought to use black before and wow, just look at those colours pop!


I used Mama Elephant's Index Card Creative Cuts to cut my panel and a kraft card mat. For my background I took another piece of white card and coloured using the same rainbow  I did on my main element and, again, blended with water.

I loved the simplicity of the bright colours doing the talking for themselves, so, after building up my card, left it there.

I love when you find a technique that makes you go back through your stash seeing what would work with it, and this for sure made me do that!

I really hope you like it.

See you next week

Jillx

Dreams into PlansIndex Card Creative Cuts Image 1


Thursday, 24 March 2016

Dangling Donuts...

Hi everybody,

Quick post to share a card I have made for the current challenge going over at the awesome Lawnscaping blog, where this week, it's all about, 'Sweets', and is so kindly sponsored by the amazing Lawn Fawn themselves.

And here's my card...


I made a fun card full of delicious dangly donuts and perfect plaid.


I started by stamping out these cutie pie little donuts from Lawn Fawn's 'Donut Worry' set, twice each for a front and a back, colouring using Zig Clean Colour markers and a waterbrush, and die-cutting.  I added the little sprinkles on top using matching colours of embossing powder, and the fun little faces in black ink.  I then took my card base and a piece of  Lawn Fawn's Plaid Paper, and cut a matching aperture from both using Mama Elephant's Index Card Creative Cuts die. I used the same set to cut a cute little white scalloped border to sit on top of my frame.  I used invisible thread, sandwiched between my front panel and card blank to 'dangle' my donuts from.  I covered my little guys, front and back in double-sided tape and wet glue, just to make sure they were stuck fast, then sandwiched them together, trapping the invisible thread in the middle.


I stamped out my sentiment, from the same Donut Worry set, in black ink and onto white card, cut into wee little banners, and adhered to the front of my card using foam adhesive.  I then added the leftover piece of Plaid paper to the back/inside of my card, and there you have it.

I really hope you like it and would love to read your comments so please feel free to leave them :)

Hopefully see you soon.

Jillxxx


Friday, 18 March 2016

Hello, new baby.

Hi everybody,

Jill here, and this week I've got some simple Spring watercolour...


...to welcome a new arrival to this world.


I used Mama Elephant's gorgeous 'New Family' set to make my card.  It is such a beautiful and sweet set, full of soft and gentle images.
I started with a piece of watercolour card and, using a mix of Picked Raspberry and Worn Lipstick Distress Ink, brushed some simple stripes across my card.  I wanted it to look really loose, relaxed and laid back so did it free hand, I wanted to embrace the imperfections.


I then stamped out all my New Family images and coloured them, again intentionally keeping them soft and not over-thought, using my Zig Clean Colour Brush Pens, then fussy cut.  I die-cut a small circle from my front panel, and created a little scalloped edge border using a die from my stash, to create a little aperture from which to build my scene.  I then took a separate piece of card and stamped out the amazing Sketched Chevrons background from MFT, heat embossed in white and washed over it in blue - I wanted a simple but pretty background for my scene.


My sentiment is from the same gorgeous New Family set, and is simply stamped in black and clear heat embossed.
I built up my sweet little scene behind my aperture, adhered the whole thing in place and added my main panel over the top using foam adhesive to give my aperture scene some dimension.  I then mounted the whole thing onto a piece of light grey card, added a scattering of clear sequins, and there you have it.

I really hope you like it.

As always, everything is linked below, and I shall see you all next week 

Jillxxx

New Family StampSketched Chevron Background

Wednesday, 16 March 2016

A Neat Tangle of Ombre...

Hi everybody,

I'd like to share a card I have made to play along with the latest challenge going on over at the amazing Neat and Tangled, Little Tangles challenge blog.  I've been out of the game playing along with challenges recently, but am so excited to get back in the saddle and start having some fun again!  So, this time round, the Little Tangles challenge is, Ombre.  Well boy oh boy...I love me a bit of Ombre!
And here's my card...


I started by repeatedly stamping out one the strip stamps form Neat and Tangled's 'On The Strip 2', on a panel of white card, using a variety of inks, going from a dark green/blue, to a light green/blue.  I then used Mama Elephant's Index Card Creative Cut to cut a stitched panel from the centre, and the scalloped edge panel to cut a piece from kraft card.  


I then took another piece of white card and inked the edges up in the same 'ombre' colours and gradation as my front panel.
I then took Neat and Tangled's 'Hope Anchors', inked it up in Versamark, and heat embossed using a beautiful Copper Wow embossing powder.  I just think Blue/Green and Copper are stunning together!


I built up my card using a mix of wet glue and foam tape for a little dimension, embellished with a scattering of co-ordinating sequins, and there you have it.
I enjoyed creating this design so much, I made another, using the same techniques, but a different colour way...


I really hope you like them, and would love to read your thoughts, so please feel free to leave nay comments.

Hopefully see you soon.

Jillx


Getting to grips with The Greeting Farm...

Hi everybody,

I'm sharing a first today...my first time EVER playing with the absolutely gorgeous Greeting Farm stamps.  I'm obviously a late comer to these amazing stamps, and was turned onto them by the awesome Kristina Werner, I just couldn't believe I had never seen them before...it was definitely love at first sight!  We can't get them here in the UK, so I got me some from the one and only Simon Says Stamp...and now I just want neeeeeeed them all :)

So I thought it would be fun to 'pop my cherry' by playing along with their monthly challenge, The Farm Fresh Challenge, where March's theme is...Animals Rule!

And here's my card...


I used the Purfect Cats set to make my card.  Just the cutest little chubby kitty images in all the world!


I started by stamping out my images - the little kitty's, the cute cupcake, a little log/post, and the fluffy clouds (both from Mama Elephant sets), coloured with Copics, and fussy cut them all.  I then inked up by back ground using Distress Inks to create a pretty Spring sky.  I cut a few different layers of Lawn Fawn's Grassy Border die, and started to build up my scene.  I wanted it to look like the cute cats were bouncing and jumping around trying to get the cupcake off the post so added some boingy/springy marks to the scene to add the suggestion.  I stamped my sentiment into one of my clouds and clear heat embossed, then adhered everything in place using a mix of wet glue and foam adhesive for a little dimension.


I matted my panel onto a piece of black card, then mounted the whole thing onto a kraft card base and there you have it.  I thoroughly enjoyed my first play with these cool stamps, and now can't wait to build up my collection!

I really hope you like it, and would love to read any comments, so please feel free to leave one :)

Hopefully see you soon.

Jillx


Tuesday, 15 March 2016

Sending 'A Bit O' Green' Good Luck...

Hi everybody,

I'd love to share a card I have made to play along with this week's challenge over on the, always awesome, Simon Says Stamp Wednesday Challenge Blog, where this time round, in celebration of the up-and-coming, St.Patrick's Day, the 'theme' is, 'A Bit O Green'.

Simon Wednesday Challenge Blog

And here's my card...


I started by creating a watercolour wash, with a few splashes and splodges, using a variety of Distress Inks, (Lucky Clover, Cracked Pistachio, Fossilised Amber), across my card panel as a backdrop to my sentiment and scene.  I then smooshed Hero Arts' Green Ombre Ink pad onto a piece of card, and die-cut the Simon Says Stamp 'Sending' die from it, (which didn't show up too great in the photo...but it is 'ombre'...I promise!).  I cut the die from a piece of white foam at the same time to add some dimension to my sentiment.  I then stamped out a bunch of four-leaf clovers from Lawn Fawn's 'My Lucky Charm' set, coloured using Copics, and fussy cut.  I built-up my sentiment by using the 'Good Luck' from the same Lawn Fawn set, stamped onto vellum, and heat embossed in white.  I simply wrapped my strip of vellum around my card and taped at the back to keep it in place.  I then covered another piece of card in Versamark Ink, and heat embossed it using a Copper Wow embossing powder, then die-cut the gorgeous Simon Says Stamp 'Tiny Hearts Outline' die from it.
I then built up my little sentiment scene, using a mix of wet glue and foam adhesive, and embellished with a scattering of my copper Tiny Hearts.


I mounted my panel onto a kraft card base, and there you have it.

I really hope you like it, and would love to read your comments, so please feel free to leave any :)

Hopefully see you soon, and oh...Happy St Patrick's Day!

Jillx


Saturday, 12 March 2016

Simple Springtime Stripes...

Hi everybody,

I'd like to share a card I have made for the current challenge going on over on the brilliant Lawnscaping blog, where this time round, it's all about a 'Splash of Colour'...I've loved this theme so much I couldn't stop making cards to play along with and have used up all my 3 lives haha.


And here's my card...


I wanted to create a really clean and fresh design to celebrate the fact that Spring is on it's way, and what says  'Spring' more than a nice simple stripe?!
I started by stamping out my little scene and sentiment, using elements from Lawn Fawn's Hello Sunshine, in Black Versafine Ink, and clear heat embossing.  I then masked off my open spaces using masking fluid and left to dry.  I wanted my stripes to be a clean, fresh 'Spearmint' colour, but didn't have anything that matched the vision in my head exactly, so I made my own by mixing Cracked Pistacio and Peacock Feather's Distress Inks.  I gave them a spritz of water and added my stripes across the front of my card, freehand, to add to the chilled airy vibe I was going for.  Once completely dry, I removed my masking fluid and added a slick of Wink of Stella in it's place, then covered in Glossy Accents.


I matted my panel onto a piece of black card, mounted the whole thing onto a white card base, and that was that.  I skipped embellishments to enhace the CAS design, although looking at it now I'm itching to add some clear sequins haha.

I really hope you like it, and would love to read your comments so please feel free to leave one :)

Hopefully see you next time,

Jillx


Mini Flags Rainbow...

Hi everybody,

I'd like to share a card I have made for the March Challenge going on over at the, always awesome, A Blog Named Hero, where this time round, it's all about the Rainbow.  And as if the theme wasn't cool enough, they're collaborating with the mighty Avery Elle - good stuff, ey?  This is my second entry as, well, I just couldn't stop at one :)


http://www.averyelle.com/

And here's my card...


*I'll give you a moment while you adjust your eyes haha*
I started by creating a piece of rainbow card using my Copics on a piece of white card, then cut Avery Elle's Thank You Elle-ments die from it, cutting it from a piece of white foam at the same time to add behind for dimension.  I stamped out Hero Arts Tiny Flags Background in black Versafine, and clear embossed, then cut the same Avery Elle die from it, to allow me to in-lay my rainbow die-cut back in.


I used a handful of the same Copics to colour the negative spaces in my background to add an extra splash of rainbow colour, which I then coated in a slick of Wink of Stella, and a good covering of Glossy Accents, doing the same with my die-cut sentiment.
I then matted my piece onto black card which i had edged with clear Wink of Stella, and mounted onto a white card base.
Now you can see the card, it's pretty trippy to look at in anycase, which I really like, but I thought it was already more than enough so left it there.

I really hope you like it, thanks so much for stopping by.

See you soon.
Jillx